The Senior Developer AI Playbook: How Expert Engineers Leverage AI to Multiply Impact

How experienced developers, architects, and technical leaders use AI as a strategic force multiplier — not a replacement for thinking.

The Paradigm Shift: AI as Leverage, Not Crutch

AI coding assistants have fundamentally transformed software development, but the revolution isn’t what most people expect. For senior developers, architects, and engineering leaders, AI isn’t about writing code faster or avoiding difficult problems. It’s about strategic leverage.

The distinction is critical:

Juniors use AI to avoid thinking.
Seniors use AI to think better.

This playbook reveals how experienced engineers actually integrate AI into their workflows, with practical prompts, real code examples, and battle-tested strategies for React, TypeScript, and modern frontend architectures.

The Core Principle: Amplification, Not Replacement

Experience Level × AI = Output Quality
Junior (Low Experience) × AI = Amplified Mistakes
Senior (High Experience) × AI = Amplified Impact

The Iron Rule: AI augments judgment — it doesn’t create it. Without fundamentals, AI becomes dangerous. With expertise, it becomes transformative.

1. Architecture & System Design: The Strategic Layer

When Senior Engineers Use AI for Architecture

Senior developers don’t ask AI to design systems. They use it to:

  • Challenge their assumptions before committing to an approach
  • Explore alternative patterns they might have overlooked
  • Document decisions with AI-generated RFC summaries
  • Evaluate technical debt against modern standards

Master Prompt: Architecture Review

Real-World Example: Feature Flag Architecture

Act as a Staff Frontend Engineer with 10+ years of experience.Review this React + TypeScript architecture for:
- Scalability bottlenecks
- Testing strategy gaps
- Long-term maintainability concerns
- Performance considerationsARCHITECTURE:
[Your architecture description or diagram]Provide:
1. Risk assessment (HIGH/MEDIUM/LOW for each risk)
2. Trade-off analysis
3. Three alternative approaches with pros/cons
4. Recommended next steps

Scenario: You’re designing a feature flag system for a React application.

// Initial approach - needs review
interface FeatureFlags {
newCheckout: boolean;
darkMode: boolean;
experimentalUI: boolean;
}

const FeatureFlagProvider: React.FC = ({ children }) => {
const [flags, setFlags] = useState<FeatureFlags>({
newCheckout: false,
darkMode: false,
experimentalUI: false
});
useEffect(() => {
fetch('/api/flags').then(res => res.json()).then(setFlags);
}, []);
return (
<FlagContext.Provider value={flags}>
{children}
</FlagContext.Provider>
);
};

AI Analysis Request:

Review this feature flag implementation. Consider:
- Type safety for new flags
- Performance with many flags
- Testing strategy
- Rollout safety
- A/B testing capability

AI Response Reveals: Missing flag validation, no loading states, no error boundaries, type system won’t catch new flags, and no gradual rollout mechanism.

Improved Implementation:

// AI-informed improvement
type FlagKey = 'newCheckout' | 'darkMode' | 'experimentalUI';

interface FeatureFlag {
enabled: boolean;
rolloutPercentage?: number;
dependencies?: FlagKey[];
}

type FeatureFlags = Record<FlagKey, FeatureFlag>;

interface FlagContextValue {
flags: FeatureFlags;
isLoading: boolean;
error: Error | null;
isEnabled: (key: FlagKey) => boolean;
}

const FeatureFlagProvider: React.FC = ({ children }) => {
const [state, setState] = useState<{
flags: FeatureFlags;
isLoading: boolean;
error: Error | null;
}>({
flags: {} as FeatureFlags,
isLoading: true,
error: null
});

useEffect(() => {
fetch('/api/flags')
.then(res => res.json())
.then(flags => setState({ flags, isLoading: false, error: null }))
.catch(error => setState(prev => ({
...prev,
isLoading: false,
error
})));
}, []);

const isEnabled = useCallback((key: FlagKey): boolean => {
const flag = state.flags[key];
if (!flag) return false;

// Check dependencies
if (flag.dependencies?.some(dep => !isEnabled(dep))) {
return false;
}

// Check rollout percentage
if (flag.rolloutPercentage) {
const userId = getUserId(); // Get stable user ID
const hash = simpleHash(userId + key);
return (hash % 100) < flag.rolloutPercentage;
}

return flag.enabled;
}, [state.flags]);

return (
<FlagContext.Provider value={{ ...state, isEnabled }}>
{children}
</FlagContext.Provider>
);
};

Key Insight: AI didn’t write this code — it revealed the gaps in the original design. The senior developer made the architectural decisions.

2. AI-Assisted Code Reviews: Beyond Syntax Checking

What Seniors Review (That Juniors Miss)

Junior Focus          Senior Focus
├─ Syntax ├─ Readability
├─ Basic bugs ├─ Edge cases
└─ Style guide ├─ Performance implications
├─ Future maintenance burden
├─ Team conventions
└─ System-wide impact

Master Prompt: Senior-Level PR Review

Review this pull request as a senior engineer.

CODE:
[paste PR diff]

Focus on:
1. Naming clarity and intent
2. Edge cases and error handling
3. Long-term maintainability
4. Performance implications
5. Testing gaps
6. Breaking changes or migration needs

Provide constructive, actionable feedback ranked by priority.

Pro Strategy: Pre-Review Before Submission

// Before submitting PR, ask AI:
const preReviewPrompt = `
Review this code I'm about to submit:

${codeDiff}

What would a senior engineer flag?
What tests am I missing?
What edge cases haven't I considered?
`;

This dramatically improves PR quality and reduces back-and-forth with reviewers.

3. Performance Optimization: From Symptom to Root Cause

The Senior Approach to Performance

AI finds symptoms. You diagnose root causes.

Master Prompt: Performance Audit

Analyze this React component for performance issues.

COMPONENT:
[paste component code]

USER CONTEXT:
- Component renders in a list of 500+ items
- Users report lag when scrolling
- Re-renders seem frequent

Identify:
1. Unnecessary re-renders
2. Expensive operations in render path
3. Missing memoization opportunities
4. Memory leaks

Suggest optimizations with reasoning.

Real Example: Dashboard Performance Issue

Problem Code:

const Dashboard: React.FC = () => {
const [data, setData] = useState<DashboardData[]>([]);

// This runs on every render!
const processedData = data.map(item => ({
...item,
formattedDate: formatDate(item.date),
metrics: calculateMetrics(item),
trend: analyzeTrend(item.history)
}));

const filteredData = processedData.filter(item =>
item.status === 'active'
);

return (
<div>
{filteredData.map(item => (
<DashboardCard key={item.id} data={item} />
))}
</div>
);
};

AI Analysis Reveals:

  • Expensive computations run on every render
  • No memoization
  • Array operations create new references
  • Child components re-render unnecessarily

Senior-Optimized Solution:

const Dashboard: React.FC = () => {
const [data, setData] = useState<DashboardData[]>([]);

// Memoize expensive processing
const processedData = useMemo(
() => data.map(item => ({
...item,
formattedDate: formatDate(item.date),
metrics: calculateMetrics(item),
trend: analyzeTrend(item.history)
})),
[data] // Only recalculate when data changes
);

// Memoize filtering
const filteredData = useMemo(
() => processedData.filter(item => item.status === 'active'),
[processedData]
);

return (
<div>
{filteredData.map(item => (
<MemoizedDashboardCard key={item.id} data={item} />
))}
</div>
);
};

4. Legacy Code Refactoring: The Senior’s Battlefield

Legacy code is where senior developers prove their value. AI can accelerate refactoring, but only with proper strategy.

Master Prompt: Safe Refactor

Refactor this legacy React class component to modern hooks.

REQUIREMENTS:
- Preserve exact behavior
- Explain each transformation
- Highlight any behavior that might change
- Suggest test cases to verify equivalence

LEGACY CODE:
[paste class component]

The Senior Refactoring Process

1. AI generates refactor  →  Don't trust it yet
2. Review each change → Verify behavior preservation
3. Write tests first → AI can help generate tests
4. Refactor incrementally → Small, verifiable steps
5. Manual validation → Run through all scenarios

Example: Class to Hooks Migration

Legacy Class Component:

class UserProfile extends React.Component<Props, State> {
state = {
user: null,
loading: true,
error: null
};

componentDidMount() {
this.fetchUser();
}

componentDidUpdate(prevProps: Props) {
if (prevProps.userId !== this.props.userId) {
this.fetchUser();
}
}

fetchUser = async () => {
this.setState({ loading: true, error: null });
try {
const user = await api.getUser(this.props.userId);
this.setState({ user, loading: false });
} catch (error) {
this.setState({ error, loading: false });
}
};

render() {
const { user, loading, error } = this.state;
if (loading) return <Spinner />;
if (error) return <Error error={error} />;
return <UserCard user={user} />;
}
}

AI-Assisted Modern Version:

const UserProfile: React.FC<Props> = ({ userId }) => {
const [user, setUser] = useState<User | null>(null);
const [loading, setLoading] = useState(true);
const [error, setError] = useState<Error | null>(null);

// Consolidated fetch logic
useEffect(() => {
let cancelled = false; // Prevent state updates after unmount

const fetchUser = async () => {
setLoading(true);
setError(null);

try {
const userData = await api.getUser(userId);
if (!cancelled) {
setUser(userData);
setLoading(false);
}
} catch (err) {
if (!cancelled) {
setError(err as Error);
setLoading(false);
}
}
};

fetchUser();

return () => {
cancelled = true; // Cleanup
};
}, [userId]); // Re-fetch when userId changes

if (loading) return <Spinner />;
if (error) return <Error error={error} />;
return <UserCard user={user} />;
};

Senior Validation Checklist:

  • ✅ Cleanup function added (AI might miss this)
  • ✅ Dependency array correct
  • ✅ Race condition handled
  • ✅ Behavior identical to original
  • ✅ Tests pass

5. TypeScript as a Senior Safety Net

Senior developers use TypeScript not just for autocomplete, but to encode business rules and prevent entire classes of bugs.

Master Prompt: Type Safety Upgrade

Improve type safety in this code.

CODE:
[paste code with 'any' types or loose typing]

Requirements:
- Eliminate 'any' types
- Introduce generics where appropriate
- Use discriminated unions for state
- Explain how each type improvement prevents bugs

Example: Payment Flow Type Safety

Weak Types (Junior Approach):

interface PaymentState {
status: string;
amount?: number;
error?: string;
transactionId?: string;
}

const processPayment = (data: any) => {
// Runtime checks everywhere
if (!data.amount) throw new Error('Amount required');
// ... more runtime validation
};

Strong Types (Senior Approach):

// Discriminated union encodes state machine
type PaymentState =
| { status: 'idle' }
| { status: 'processing'; amount: number }
| { status: 'success'; transactionId: string; amount: number }
| { status: 'failed'; error: Error; amount: number };

// Type-safe payment data
interface PaymentData {
amount: number;
currency: 'USD' | 'EUR' | 'GBP';
method: PaymentMethod;
}

// Generic result type
type Result<T, E = Error> =
| { success: true; data: T }
| { success: false; error: E };

const processPayment = async (
data: PaymentData
): Promise<Result<{ transactionId: string }>> => {
// TypeScript guarantees all required fields exist
try {
const response = await api.charge(data);
return { success: true, data: { transactionId: response.id } };
} catch (error) {
return { success: false, error: error as Error };
}
};

// Usage - compiler forces handling all cases
const handlePayment = async (data: PaymentData) => {
const result = await processPayment(data);

if (result.success) {
// TypeScript knows transactionId exists here
console.log(`Success: ${result.data.transactionId}`);
} else {
// TypeScript knows error exists here
console.error(`Failed: ${result.error.message}`);
}
};

Senior Insight: If AI struggles to add proper types to your code, it’s often a signal that your abstractions aren’t clear.

6. Testing Strategy: What to Test, Not Just How

The Senior Testing Pyramid

Master Prompt: Test Strategy

Act as a QA-minded senior engineer.

CODE:
[paste feature code]

Identify:
1. Missing test scenarios
2. Critical edge cases
3. Integration points
4. Failure modes

Suggest specific test cases with examples.
Prioritize by risk level.

Example: Shopping Cart Test Strategy

Feature Code:

class ShoppingCart {
private items: CartItem[] = [];

addItem(product: Product, quantity: number): void {
const existing = this.items.find(i => i.productId === product.id);

if (existing) {
existing.quantity += quantity;
} else {
this.items.push({
productId: product.id,
quantity,
price: product.price
});
}
}

calculateTotal(): number {
return this.items.reduce(
(sum, item) => sum + (item.price * item.quantity),
0
);
}

applyDiscount(code: string): number {
// Apply discount logic
}
}

AI Test Strategy Analysis:

describe('ShoppingCart', () => {
// HIGH PRIORITY - Business Critical
describe('calculateTotal', () => {
it('calculates total for single item', () => {
const cart = new ShoppingCart();
cart.addItem({ id: '1', price: 10 }, 2);
expect(cart.calculateTotal()).toBe(20);
});

it('calculates total for multiple items', () => {
const cart = new ShoppingCart();
cart.addItem({ id: '1', price: 10 }, 2);
cart.addItem({ id: '2', price: 5 }, 3);
expect(cart.calculateTotal()).toBe(35);
});

// EDGE CASE - AI suggested this
it('handles floating point precision', () => {
const cart = new ShoppingCart();
cart.addItem({ id: '1', price: 0.1 }, 3);
expect(cart.calculateTotal()).toBe(0.3);
});

// EDGE CASE - Critical for empty state
it('returns 0 for empty cart', () => {
const cart = new ShoppingCart();
expect(cart.calculateTotal()).toBe(0);
});
});

// HIGH PRIORITY - Data Integrity
describe('addItem', () => {
it('combines quantities for duplicate products', () => {
const cart = new ShoppingCart();
const product = { id: '1', price: 10 };

cart.addItem(product, 2);
cart.addItem(product, 3);

expect(cart.calculateTotal()).toBe(50); // 5 items × $10
});

// EDGE CASE - AI flagged this
it('handles zero quantity', () => {
const cart = new ShoppingCart();
cart.addItem({ id: '1', price: 10 }, 0);
expect(cart.calculateTotal()).toBe(0);
});

// EDGE CASE - Negative quantity
it('handles negative quantity appropriately', () => {
const cart = new ShoppingCart();
expect(() => {
cart.addItem({ id: '1', price: 10 }, -1);
}).toThrow('Quantity must be positive');
});
});

// MEDIUM PRIORITY - Feature Correctness
describe('applyDiscount', () => {
it('applies valid discount code', () => {
// AI suggests discount scenarios
});

it('rejects invalid discount code', () => {
// AI suggests validation scenarios
});

it('applies discount only once', () => {
// AI catches double-discount bug
});
});
});

Senior Rule: AI writes tests fast. You decide what matters.

7. Decision Making: AI as Your Second Brain

Senior engineers make decisions considering cost, risk, team velocity, and long-term maintenance — not just technical elegance.

Master Prompt: Decision Analysis

Compare these two implementation approaches for [FEATURE].

APPROACH A:
[description]

APPROACH B:
[description]

Analyze trade-offs:
1. Implementation complexity
2. Performance characteristics
3. Developer experience
4. Long-term maintenance cost
5. Team skill requirements
6. Testing difficulty

Recommend one with justification.
Consider we have a team of 5 mid-level engineers
and need to ship in 3 weeks.

Example: State Management Decision

Decision: Choose between Redux Toolkit vs. Zustand for new feature

// Approach A: Redux Toolkit
const userSlice = createSlice({
name: 'user',
initialState: { data: null, loading: false },
reducers: {
setUser: (state, action) => {
state.data = action.payload;
}
},
extraReducers: (builder) => {
builder
.addCase(fetchUser.pending, (state) => {
state.loading = true;
})
.addCase(fetchUser.fulfilled, (state, action) => {
state.data = action.payload;
state.loading = false;
});
}
});

// Approach B: Zustand
const useUserStore = create((set) => ({
user: null,
loading: false,
fetchUser: async (id) => {
set({ loading: true });
const user = await api.getUser(id);
set({ user, loading: false });
}
}));

AI Decision Framework Output:

RECOMMENDATION: Zustand (Approach B)

REASONING:
1. Implementation: 40% less boilerplate
2. Team velocity: Easier learning curve
3. Debugging: Simpler mental model
4. Performance: Comparable for your scale
5. Risk: Lower migration cost if needs change

WHEN Redux Toolkit is better:
- Complex state interactions
- Time-travel debugging needed
- Large team standardization
- Existing Redux ecosystem

YOUR CONTEXT favors Zustand:
- Small team (5 engineers)
- Tight deadline (3 weeks)
- Feature-specific state
- Mid-level team

Senior Insight: AI helps you think broader, not deeper. The final call is yours.

8. Mentorship at Scale: Multiply Your Impact

One senior developer can mentor many with AI assistance.

Master Prompt: Mentorship

Explain this code to a junior developer.

CODE:
[paste complex code]

Requirements:
- Use simple language
- Provide real-world analogies
- Explain "why" not just "what"
- Highlight common pitfalls
- Suggest improvements for learning

Example: Explaining Closures

Complex Code:

function createCounter() {
let count = 0;
return {
increment: () => ++count,
decrement: () => --count,
getCount: () => count
};
}

AI-Generated Junior Explanation:

“Think of createCounter like a vending machine factory. When you call the factory, it builds a new machine with its own private coin counter inside.

The count variable is like coins locked inside the machine—no one can reach in and touch them directly. The only way to interact is through the buttons (increment, decrement, getCount).

This is called a closure — the inner functions ‘remember’ the count variable even after createCounter finishes running. Each machine has its own private counter.”

This scales your mentorship impact beyond 1:1 meetings.

9. The Senior’s AI Tooling Stack

Daily Workflow Integration

Development Phase          Tool
─────────────────────────────────────────────
Architecture → ChatGPT / Claude
Code Writing → GitHub Copilot
Code Review → ChatGPT + Manual
Large Codebase Search → Sourcegraph Cody
Test Generation → CodiumAI
Security Scanning → Snyk AI
Performance Monitoring → Lighthouse + AI Analysis
Documentation → ChatGPT
Mentorship → ChatGPT

Example Workflow: New Feature Development

1. Architecture Planning
├─ AI: Generate 3 approaches
├─ Senior: Evaluate trade-offs
└─ AI: Draft RFC document

2. Implementation
├─ Copilot: Accelerate boilerplate
├─ Senior: Review each suggestion
└─ AI: Explain complex libraries

3. Testing
├─ AI: Generate test cases
├─ Senior: Prioritize by risk
└─ AI: Generate test code

4. Review
├─ AI: Pre-review before PR
├─ Senior: Manual verification
└─ Team: Human review

5. Documentation
├─ AI: Generate initial docs
├─ Senior: Add context & decisions
└─ AI: Format for team wiki

10. The Mental Model: Senior + AI
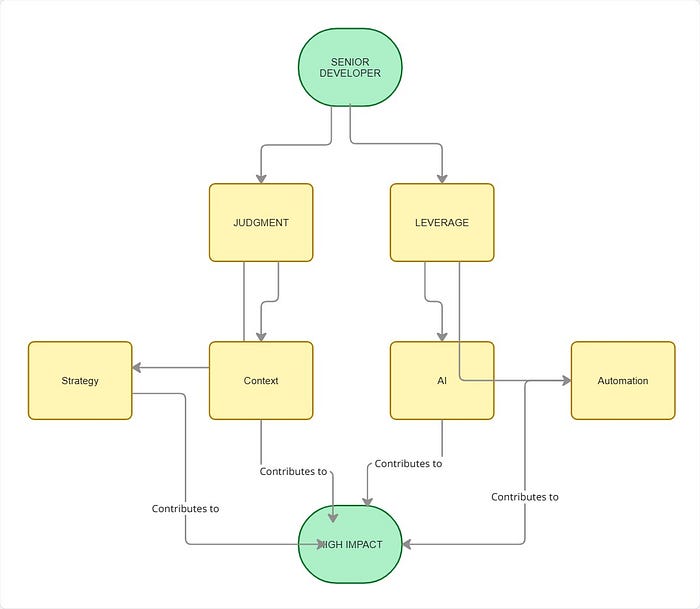
The Formula:

Impact = (Experience × Judgment) × AI Leverage

Where:
- Experience: Pattern recognition, system thinking
- Judgment: Trade-off evaluation, risk assessment
- AI Leverage: Acceleration, exploration, automation

Key Takeaways for Senior Engineers

✅ DO

  • Use AI to challenge your assumptions
  • Ask for multiple approaches and compare trade-offs
  • Pre-review code with AI before submitting PRs
  • Generate tests, but decide what matters
  • Use AI for documentation and mentorship scaling
  • Treat AI suggestions as starting points, not solutions

❌ DON’T

  • Accept AI output blindly
  • Let AI make architectural decisions
  • Skip understanding the code AI generates
  • Merge without manual verification
  • Use AI as an excuse for lack of fundamentals
  • Forget that you own the consequences

Conclusion: The Hybrid Senior Engineer

The future belongs to senior engineers who master the hybrid workflow:

Human Strengths: Judgment, context, experience, intuition, responsibility
AI Strengths: Speed, pattern matching, exploration, documentation, scale

The best senior engineers use AI not to avoid thinking, but to think better, faster, and at greater scale.

AI won’t replace senior engineers — but senior engineers who use AI will replace those who don’t.

Next Steps

  1. Try one prompt from this playbook today in your current work
  2. Pre-review your next PR with AI before submission
  3. Ask AI to challenge your next architectural decision
  4. Generate mentorship content for your junior teammates
  5. Measure the impact on your velocity and code quality

Remember: AI is not a shortcut. It’s a force multiplier for those who already know what they’re doing.

AI tools that help with coding: How Intelligent Assistants Are Transforming Software Development

🧠 1. AI Pair Programmers / Code Generation

These are your main “Copilot-style” assistants that suggest or write code in real time.

ToolDescriptionSupported Languages
GitHub CopilotThe most popular AI coding assistant, built on OpenAI models; integrates into VS Code, JetBrains, etc.30+ languages (JS, Python, Java, etc.)
Replit GhostwriterReal-time AI help inside Replit IDE — autocompletes and explains code.Many popular languages
Amazon CodeWhispererAWS’s AI assistant, focuses on cloud development and AWS SDKs.Python, JavaScript, Java, C#, Go, etc.
TabnineCode completion using smaller, private AI models — good for enterprise use.20+ languages
Cody (Sourcegraph)Context-aware AI assistant that understands your entire codebase for smarter answers.Most major languages
CodeiumFree alternative to Copilot, supports autocompletion, chat, and documentation generation.70+ languages

🔍 2. AI Debugging & Code Explanation Tools

These tools help you find bugs, understand legacy code, or refactor.

ToolDescriptionKey Features
OpenAI GPT-5 (ChatGPT)Can analyze and fix code, explain algorithms, generate documentation, and even simulate test cases.Debugging, optimization, documentation
Mutable.aiAI refactoring and code improvement assistant.Refactor, comment generation
ExplainDevChrome/VS Code extension that explains code snippets in simple English.Code understanding for learners
AskCodiOffers AI code explanations, doc generation, and test creation.Multi-language support

🧩 3. Frontend/UI Development Helpers

Perfect for React, UI/UX, or frontend design automation.

ToolDescriptionUse Case
Locofy.aiConverts Figma or Adobe XD designs into React/Next.js code.UI to code conversion
Uizard.ioTurns hand-drawn sketches or wireframes into interactive designs and code.Fast prototyping
TeleportHQAI-powered front-end builder that generates clean React, Vue, or HTML/CSS code.UI generation
AnimaConverts Figma designs to responsive React components.Design handoff automation
Galileo AIGenerates UI designs from text prompts.Concept to design flow

⚙️ 4. Testing, DevOps, and Productivity

These AI tools handle automation, testing, and code management.

ToolDescriptionUse Case
CodiumAIAutomatically writes meaningful test cases for your functions.Unit testing
DeepCode (by Snyk)AI code review that identifies bugs and vulnerabilities.Security & code quality
Ponicode (by CircleCI)Helps write and maintain unit tests using AI.Test automation
ContinualAI model monitoring and versioning integrated into pipelines.ML workflow management

📘 5. AI Learning & Skill-Building Tools

For those who want to learn coding with AI help.

ToolDescriptionUse Case
ChatGPT (GPT-5)Explains code concepts, builds small projects, answers syntax questions.Learning, mentorship
CodeCombatTeaches programming through games using AI feedback.Learning Python/JS
Kaggle Notebooks + AI AssistAI helper for data science projects.Python, ML
DataCamp Workspace AIAI hints for coding exercises and data analysis.Data science learning

🧰 6. Specialized AI Code Tools

For niche or advanced use.

ToolDescriptionFocus Area
Smol Developer (Hugging Face)Creates small, production-ready AI agents for specific coding tasks.AI agent development
Dust.ttHelps build internal AI assistants that can code or manage APIs.Custom AI workflows
Warp TerminalAI-powered terminal that understands commands and suggests fixes.DevOps productivity
AiderAI CLI tool for refactoring or generating code changes via Git.

React + Copilot: The Future of Frontend Development—Supercharging Component-Based UI with AI

Introduction: The Evolution of Frontend Development

React has long been the undisputed king of modern frontend development. Its declarative, component-based architecture revolutionized how developers think about building interfaces—breaking monoliths into composable, reusable units. Yet, as the ecosystem matured, so did its complexity. Today’s React developer juggles state management solutions, testing frameworks, design systems, and performance optimizations—all while ensuring code readability and maintainability.

The result? A paradox of progress. While React empowers creativity and scalability, it also burdens developers with repetitive tasks—writing boilerplate code, configuring hooks, debugging state transitions, or maintaining consistent standards across large teams. Even the most experienced engineers can find themselves bogged down by syntax and routine implementation details instead of focusing on the bigger picture: crafting meaningful user experiences.

Enter GitHub Copilot, the AI-powered coding assistant that is redefining how we build with React. More than just an autocomplete engine, Copilot acts as a “pair programmer” trained on millions of open-source patterns. It predicts intent, generates idiomatic code, and adapts to your coding style. Together, React and Copilot form a powerful alliance—one that turns repetitive development tasks into instant suggestions, freeing developers to think architecturally and creatively.

This article explores that synergy: how AI-assisted coding, paired with React’s modular design, is setting a new benchmark for efficiency, quality, and innovation in frontend development.


Section 1: The AI-Accelerated React Workflow

Boilerplate Annihilation

Every React developer knows the grind of starting a new component—importing dependencies, initializing hooks, and wiring props. Copilot shatters this cycle. A simple comment like // Create a React functional component with useState for user input can generate a complete component with imports, state setup, and a basic input handler.

Beyond just filling in gaps, Copilot learns from context. If your project uses TypeScript, it automatically adds type annotations. Need a useEffect for data fetching? Type a brief description, and Copilot drafts the entire hook—complete with cleanup logic and error handling.

This means developers spend less time typing repetitive scaffolding and more time refining logic and design. The net effect: faster iteration, reduced errors, and consistent project-wide patterns.

Intelligent Component Scaffolding

React’s compositional model is ideal for AI-powered suggestion engines. Copilot doesn’t just autocomplete lines—it constructs full JSX structures. Name a component UserProfileCard, and it may propose a styled layout with an avatar, user details, and responsive classes. When using frameworks like Material UI or Tailwind CSS, Copilot adapts its recommendations—automatically inserting appropriate class names or prebuilt components.

This contextual intelligence extends to integration points as well. If you’ve imported react-router-dom, Copilot anticipates navigation logic; if you’re working with axios, it infers API call patterns.

Data and State Management

Handling data flow in React can be nuanced. Whether it’s local component state, global context, or complex reducers, Copilot’s training enables it to suggest common patterns on demand. It can generate boilerplate for a useReducer setup, help structure a React Query data fetch, or draft a custom hook for API abstraction.

This significantly reduces friction in building scalable state management solutions—especially in large applications where consistency is key.


Section 2: Elevating Code Quality and Best Practices

Consistency Enforcement

Code consistency is one of the most overlooked challenges in team-based React projects. With Copilot, this becomes manageable. When configured with custom instructions or project guidelines, it automatically aligns suggestions with the team’s conventions—naming patterns, TypeScript rules, or preferred libraries.

For example, if your team always wraps asynchronous calls with a specific error handler or uses a designated folder structure, Copilot internalizes that behavior over time. This transforms AI from a passive tool into a dynamic enforcer of best practices.

Testing Automation

Testing is vital but often neglected due to its tedious nature. Copilot can instantly generate Jest or Vitest unit tests for components and hooks. Simply write a comment like // Write tests for Button component, and it drafts meaningful test cases—checking render states, user interactions, and prop behavior.

This shift turns testing from a post-development chore into a fluid, AI-augmented phase of the workflow, ensuring reliability without slowing down progress.

Refactoring and Modernization

As React evolves, developers face constant modernization demands—migrating class components to hooks, optimizing renders, or cleaning up legacy logic. Copilot can automate much of this transition, suggesting functional equivalents (useEffect for lifecycle methods, useMemo for expensive computations, etc.).

This accelerates technical debt reduction and ensures alignment with modern React idioms, helping teams maintain long-term code health.


Section 3: Beyond the IDE—The Developer’s New Role

From Typist to Architect

Copilot doesn’t replace developers; it liberates them. By offloading mechanical coding tasks, developers can focus on architecture, performance optimization, and user experience. The new frontier of frontend engineering isn’t about how fast you can type—it’s about how intelligently you can design, prompt, and orchestrate AI-driven workflows.

Critical Review Is Key

AI-generated code isn’t infallible—it’s probabilistic. Great developers will distinguish themselves not by writing every line from scratch, but by critically reviewing and refining AI suggestions. The ability to guide, validate, and improve Copilot’s output becomes a core skill, akin to code review and debugging. Security, efficiency, and design intent remain human responsibilities.

Learning and Onboarding Revolutionized

For junior developers, Copilot acts as a live mentor. It suggests idiomatic React patterns, clarifies unfamiliar APIs, and demonstrates clean architectural practices in real time. This shortens onboarding cycles dramatically and creates a feedback loop where learning happens continuously through example.


Conclusion: The Inevitable Partnership

React’s declarative, modular architecture makes it the perfect playground for AI-powered coding assistants. The partnership between React and GitHub Copilot represents not just a new productivity tool, but a redefinition of how we build frontend applications.

The future of frontend development is here: faster, smarter, and more collaborative—where developers architect systems, and AI accelerates their vision from idea to implementation. Together, React and Copilot are setting the new standard for building the web.

Bridging Design and Code: How Copilot Translates Figma Ideas into React Components

Target Audience: Front-End Developers, UI/UX Engineers, and Engineering Managers
Reading Time: ~8 minutes


Introduction

The traditional gap between design and code has always been one of the thorniest issues in front-end development. Designers live in Figma, crafting visual experiences pixel by pixel. Developers live in React, translating those visuals into responsive, performant components. Between the two worlds lies a fragile handoff process—often a combination of screenshots, style guides, and guesswork.

Now, with the rise of AI-powered tools like GitHub Copilot, this gap is shrinking fast. We’re entering an era where developers can convert Figma designs into high-quality React components almost instantly—without sacrificing maintainability or developer control.

This post explores the AI-assisted design-to-code workflow, focusing on how Copilot, and integrations like the upcoming Figma Dev Mode MCP Server, are changing how teams move from concept to code.


The Design-to-Code Challenge

Even in 2025, most teams still face friction between design and development:

  • Manual Translation: Developers interpret Figma designs by hand, copying dimensions, colors, and styles.
  • Inconsistent Implementation: Minor deviations from design specs lead to pixel misalignments and UX inconsistencies.
  • Inefficient Handoffs: Updates in design require repetitive code changes or full component rewrites.

The result? A slow, error-prone pipeline that undermines both developer productivity and design fidelity.

AI tools like GitHub Copilot, Figma Dev Mode, and AI-assisted code generation frameworks now promise to automate much of this workflow—without making code feel “machine-generated.”


The Modern AI Workflow: From Figma to React

Let’s break down a practical AI-driven design-to-code pipeline using the Copilot ecosystem.

1. Figma Dev Mode + Structured Design Tokens

In Figma’s Dev Mode, design elements are not just visual—they’re structured objects with metadata: spacing, colors, typography, and component hierarchies.

Figma now allows exporting these tokens as JSON or directly linking them to design systems.

Example:

{
  "button": {
    "color": { "background": "#007BFF", "text": "#FFFFFF" },
    "radius": "8px",
    "padding": "12px 16px",
    "font": { "family": "Inter", "size": "14px", "weight": "500" }
  }
}

This data forms the bridge between design and code. It’s structured enough for AI models like Copilot to reason about the intent behind the design.


2. AI-Assisted Code Generation with GitHub Copilot

Once design tokens and structure are defined, GitHub Copilot steps in.

In VS Code, you can start by describing what you want:

“Generate a React button component that matches the primary button in Figma design tokens.”

import React from "react";

interface ButtonProps {
  label: string;
  onClick?: () => void;
  variant?: "primary" | "secondary";
}

export const Button: React.FC<ButtonProps> = ({
  label,
  onClick,
  variant = "primary",
}) => {
  const styles = {
    backgroundColor: variant === "primary" ? "#007BFF" : "#F0F0F0",
    color: variant === "primary" ? "#FFFFFF" : "#000000",
    padding: "12px 16px",
    borderRadius: "8px",
    fontFamily: "Inter, sans-serif",
    fontWeight: 500,
    border: "none",
    cursor: "pointer",
  };
  return <button onClick={onClick} style={styles}>{label}</button>;
};

Copilot translates this into a working component:

Unlike previous “code generators,” Copilot understands context—imports, conventions, your existing design system, and even project file structure.

You can further refine prompts to enforce BEM, Tailwind, or styled-components conventions, or instruct Copilot to follow TypeScript interfaces and prop typing.


3. Introducing the Dev Mode MCP Server (Emerging Integration)

GitHub’s Model Context Protocol (MCP) is quietly transforming how AI models access structured project data.

The Figma Dev Mode MCP Server, an emerging integration, enables Copilot to fetch live design data—component names, constraints, tokens—directly from Figma.

Example workflow:

  1. Developer connects the Figma MCP Server in VS Code.
  2. Copilot automatically retrieves component metadata.
  3. Developer prompts: “Generate a reusable <Card /> component using the ‘Product Card’ frame in Figma.”
  4. Copilot generates React code aligned with your actual design tokens, not generic defaults.

This reduces guesswork and enables AI-driven consistency across projects.


From Copy-Paste to Maintainable Code

While AI-generated code can be impressive, production-readiness requires discipline. Here’s how mid-to-senior developers can elevate output quality.

✅ 1. Enforce Design System Integration

Before using Copilot, import your design tokens as constants or CSS variables.
This ensures Copilot uses your tokens rather than hardcoding values.

import { colors, radius, typography } from “@/design-tokens”;

Example:

Then prompt Copilot with:

“Use project design tokens instead of inline styles.”


✅ 2. Demand Semantic and Accessible Markup

Copilot is smart, but not perfect. Always enforce accessibility and semantic correctness:

<button aria-label={label}>...</button>

Prompts like:

“Generate a component that is fully accessible and keyboard-navigable.”

…often yield surprisingly complete implementations (ARIA roles, focus management, etc.).


✅ 3. Optimize for Reusability

Rather than generating one-off components, instruct Copilot to generalize:

“Refactor this button into a reusable variant-based component with configurable props.”

This helps maintain long-term design consistency and code scalability.


✅ 4. Integrate Linting, Type Checking, and Testing

Combine AI generation with automated code quality gates:

  • ESLint + Prettier → stylistic consistency
  • TypeScript strict mode → safer props
  • Jest + React Testing Library → behavioral assurance

Prompt Copilot to generate unit tests for each component:

“Write Jest tests for <Button /> covering click events and disabled states.”


Critical Perspective: The Limits of AI Code Generation

Despite the excitement, AI still faces three key limitations:

  1. Design Intent Interpretation: AI doesn’t fully understand why designers made certain choices—contextual reasoning still needs humans.
  2. Complex State Management: Translating dynamic behavior (hover, drag, animations) still requires explicit human logic.
  3. Team Conventions: AI doesn’t always follow your team’s linting, naming, or folder structure unless reinforced through examples.

That said, these limitations are narrowing quickly as context-aware AI agents (like Copilot with MCP access) become better at integrating project-level context.


Future Outlook: Towards Autonomous UI Systems

The design-to-code process is moving toward AI-powered continuous sync:

  • Design changes in Figma auto-update component code.
  • Copilot suggests incremental diffs rather than full rewrites.
  • Design systems evolve dynamically—with human review in the loop.

This doesn’t replace developers or designers; it amplifies both roles. Designers can focus on creativity, while developers concentrate on architecture, state logic, and performance—letting AI handle the visual translation.


Conclusion

The bridge between design and code is no longer a fragile handoff—it’s becoming a shared AI workspace.

GitHub Copilot, combined with structured Figma data and integrations like the Dev Mode MCP Server, allows teams to:

  • Rapidly translate Figma ideas into production-grade React components
  • Maintain design consistency and accessibility
  • Focus more on user experience and less on repetitive implementation

In short, AI doesn’t eliminate developers—it liberates them from the design-to-code grunt work and lets them build what truly matters.

How to consume GraphQl APIs in React App in 4 steps

Note: if you don’t have running React app in your local you can create new one using `create react app`
$npx create-recat-app app-name

1 – The following packages needs to be installed

  • apollo-boost: Package containing everything you need to set up Apollo Client
  • react-apollo: View layer integration for React
  • graphql-tag: Necessary for parsing your GraphQL queries
  • graphql: Also parses your GraphQL queries
$ npm install apollo-boost react-apollo graphql-tag graphql

2 – Creating An Instance Of ApolloClient

In order to be able to access a GraphQL service from our React application we need to create an instance of ApolloClient first. This is done in App.js by adding the following code:

Note : using publicly available graphql endpoint for employee info

const client = new ApolloClient({
      uri: "https://api.graph.cool/simple/v1/ciyz901en4j590185wkmexyex"
    });

3 – Connecting ApolloClient To Your React App

Having established a connection to the GraphQL endpoint by using ApolloClient we now need to connect the instance of ApolloClient to the React app. To do so, please make sure to add the following lines of code in App.js:


<ApolloProvider client={client}>
<div>
Employee Info Apollo app
</div>
</ApolloProvider>


4 – Using Query Component To Request Data

To retrieve data from the GraphQL endpoint this component makes use of another component from the React Apollo library: Query. The Query component makes it extremely easy to embed the GraphQL query directly in the JSX code of the component. Furthermore the Query component contains a callback method which is invoked once the GraphQL query is executed.

Query example :

<Query
    query={gql`
      {
        allCourses {
          id
          title
          author
          description
          topic
          url
        }
      }
    `}
  >

GIT HUB – https://github.com/Sandeep821/react-graphql

DEMO : https://codesandbox.io/s/100oq6m98q

Multi-Tenant Application

Multi-Tenant Application built with REACT (FE) and AWS lambda (API), changes ist behavior content according to a tenant

Feature: Multitenancy, Multitenancy configuration CMS, UI CMS, Dynamic theme, theme CMS, Initialization/Localization, Cloud configuration VW Portal POC Task Page 2 Initialization/Localization, Cloud configuration

Tech stack: HTML5, ES6, SASS (node-sass-chokidar), React, Redux, JEST, react-intel, bootstrap, Webpack, VS Code, NodeJS, ExpressJS, DynamoDB, Git, GitHub, Concourse CI, Docker, AWS CloudFront (S3), AWS Lambda

GIT REPO FE – https://github.com/Sandeep821/Multi-Tenant-React-App

GIT REPO BE – https://github.com/Sandeep821/Multi-Tenant-Serverless-AWS-UI-Api (Serverless API deployed on AWS)

DEMO – http://multi-tenant-app-fe.s3-website.us-east-2.amazonaws.com/

  • [for Audi: userId : audi, password: demo]
  • [Bugatti: userId : bugatti, password: demo]

Architecture:

https://github.com/Sandeep821/Multi-Tenant-React-App/blob/master/docs/MultiTenant%20App.pptx

Credit Card Validation – Angular Directive

Codepen url – http://codepen.io/sandeep821/pen/BLdVgW

Valid credit card numbers to test :

Visa : 4532069777249404 , 4916014173889326
Master : 5194775997768660, 5494872713298895
Amex : 340251740623507, 375921122764396
Discover : 6011489471829878 , 6011782582773435

Ref : https://en.wikipedia.org/wiki/Luhn_algorithm

LUHN Formula (Mod 10) for Validation of Primary Account Number

Step 1: Double the value of alternate digits of the primary account number beginning with the second digit from the right (the first right–hand digit is the check digit.)

Step 2: Add the individual digits comprising the products obtained in Step 1 to each of the unaffected digits in the original number.

Step 3: The total obtained in Step 2 must be a number ending in zero (30, 40, 50, etc.) for the account number to be validated.

Prefix, Length, and Check Digit Criteria

CARD TYPE Prefix Length Check digit algorithm
MASTERCARD 51-55 16 mod 10
VISA 4 13, 16 mod 10
AMEX 34

37
15 mod 10
Diners Club/
Carte Blanche
300-305
36
38
14 mod 10
Discover 6011 16 mod 10
enRoute 2014
2149
15 any
JCB 3 16 mod 10
JCB 2131
1800
15 mod 10